 Save
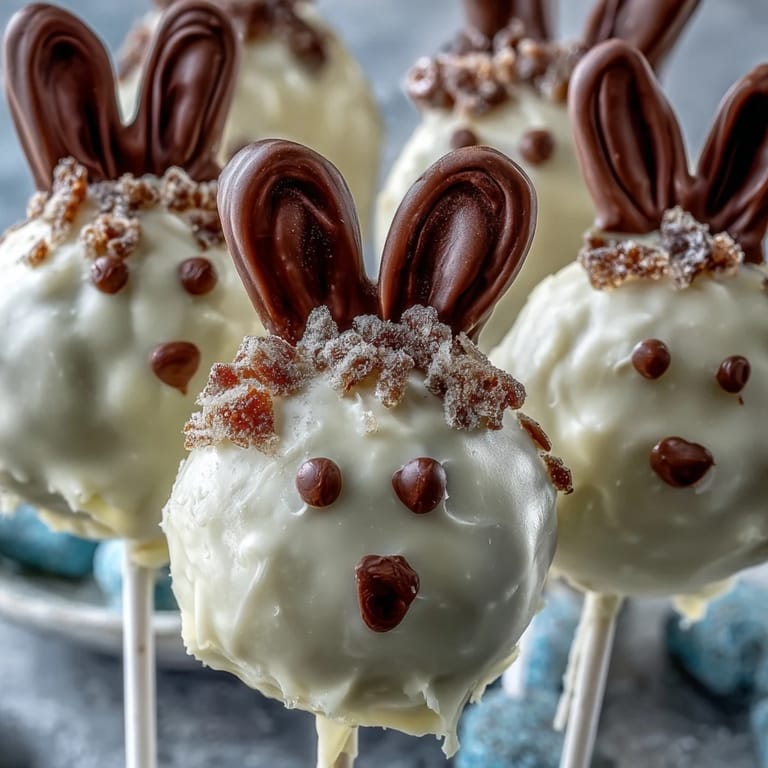
Save My daughter came home from school with a picture she'd drawn of an Easter bunny, and I knew immediately what we'd be making together that weekend. These cake pops had been on my mind since I'd spotted them at a bakery months earlier—those perfect little bunny heads with their painted-on faces and fuzzy marshmallow tails. What struck me was how something so small could bring such joy, and I wanted to create that magic in our own kitchen, with frosting under our fingernails and laughter when the first one inevitably toppled over.
I remember setting up a little assembly line on the kitchen counter with my neighbor when she stopped by unannounced. Her eyes lit up when she saw the frosting-covered cake crumbles, and before I knew it, we were both elbow-deep in decorating, trading the edible marker back and forth like we were artists at a studio. By the end, we had twenty-four perfect bunnies lined up, and she asked for the recipe before she even tasted one.
Ingredients
- Vanilla or funfetti cake mix: This is your foundation, and honestly, there's no shame in using a box mix here—it guarantees consistent moisture and crumb that holds together beautifully when you're mixing it with frosting.
- Cream cheese and butter: Together they create a frosting that's sturdy enough to bind the cake crumbles but rich enough to taste homemade, and the cream cheese adds a subtle tang that keeps these from feeling too sweet.
- Powdered sugar: Don't skip sifting this, or you'll end up with little lumps that ruin the smooth texture you're aiming for.
- White chocolate melting wafers: These are easier to work with than chopped chocolate because they're formulated to stay fluid and glossy, and they set faster too.
- Pink candy melts for ears and noses: These set quickly and hold their shape, making them perfect for sculpting little bunny details without the fussiness of tempering real chocolate.
- Lollipop sticks: Wooden ones grip better than plastic and won't slide around inside the cake balls as they set.
- Edible food marker or dark chocolate: The marker is faster, but melted dark chocolate gives a more professional look if you have the patience to wield a toothpick.
Tired of Takeout? 🥡
Get 10 meals you can make faster than delivery arrives. Seriously.
One email. No spam. Unsubscribe anytime.
Instructions
- Bake and cool your cake:
- Follow the box directions or your own recipe, and don't skip the cooling step—warm cake will ruin your frosting ratio and create a greasy, unstable mixture. I learned this the hard way when I tried to speed things up with an ice bath.
- Make a sturdy frosting:
- Beat your softened cream cheese and butter until they're completely combined, then gradually add the powdered sugar so it comes together smoothly without lumps. A stand mixer makes this effortless, but a handheld mixer works fine too.
- Create the cake pop dough:
- Crumble your cooled cake into a large bowl—use your hands and don't be gentle, you want fine crumbs. Add the frosting in small handfuls, mixing gently until the texture resembles damp sand that just barely holds together when you squeeze it.
- Roll and shape:
- Portion out roughly equal pieces and roll each into a ball, then gently press and shape into a slight oval that looks like a bunny head. These don't need to be perfect; their charm is in their imperfection.
- Freeze for stability:
- Line a baking sheet with parchment paper, arrange your cake balls, and pop them in the freezer for exactly 20 minutes. This cold snap makes them firm enough to dip without cracking or sliding off the stick.
- Prepare your chocolate station:
- Melt your white chocolate wafers according to package instructions, stirring gently to avoid incorporating air bubbles. Keep it warm but not hot—if it starts to thicken, add a tiny bit of coconut oil to loosen it up.
- Stick and dip with confidence:
- Dip just the tip of each lollipop stick into the warm chocolate, then push it halfway into a frozen cake ball—the chocolate acts like edible glue. Immediately dip the whole pop into the melted white chocolate, twisting gently and letting the excess drip back into the bowl.
- Set them upright:
- Place each dipped pop into a styrofoam block or cake pop stand with the stick pointing up, so the white coating can set evenly and smooth. If you don't have either, a tall glass filled with rice works in a pinch.
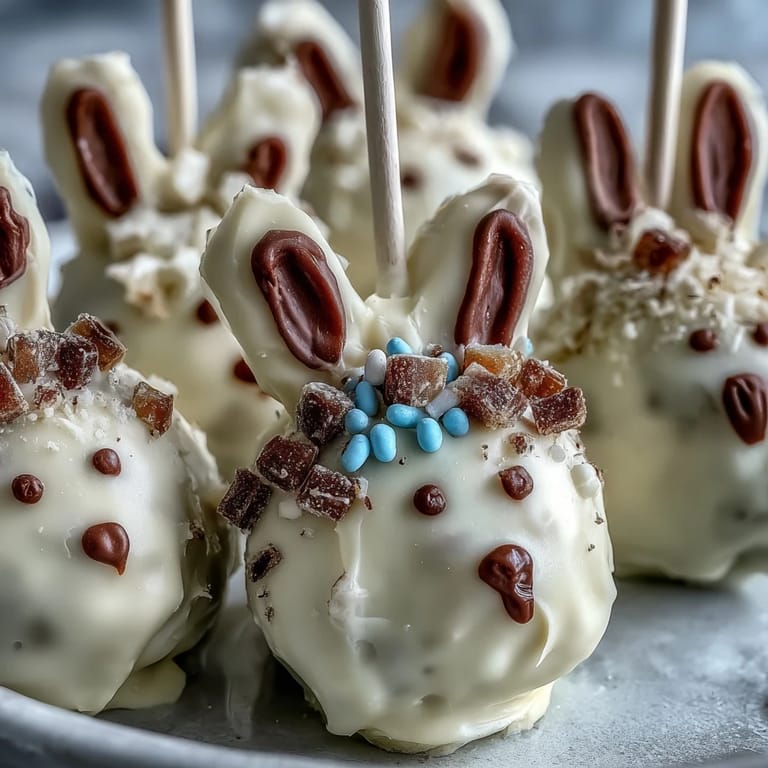
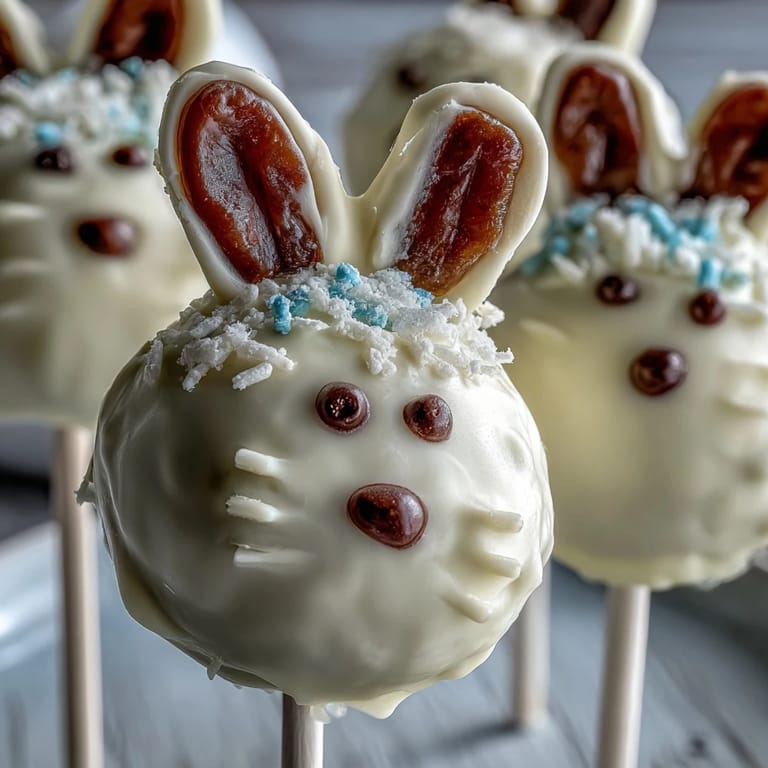
- Add ears and tails while wet:
- While the white chocolate is still tacky, press on pre-made pink candy melt ears or attach them with a tiny dot of fresh chocolate. Add a mini marshmallow tail to the back, pressing gently so it sticks.
- Draw the face:
- Once everything is set, use your edible marker to carefully draw two dots for eyes and a few whiskers radiating from the center. A pink dot in the middle becomes the nose, and suddenly your little cake ball has a personality.
- Finishing touches:
- Add sprinkles or pastel confetti while you're in the mood, then let everything cure completely before you touch them or pack them away.
 Save
Save The real moment these became special was when my daughter presented them to her class at a spring party, and three other kids asked their parents to make them at home. What started as a weekend project turned into something that connected us to the season itself, to springtime and Easter and the simple joy of creating something beautiful enough to give away.
Troubleshooting Common Cake Pop Disasters
Your cake balls are falling off the stick? They weren't cold enough, or your frosting had too much moisture in it. Pull them back out of the chocolate, refreeze them for another ten minutes, and try again. If they're cracking when you dip them, your chocolate is too hot—let it cool for a minute and the heat shock won't shatter the delicate crumbs anymore.
Making the Bunny Ears Look Professional
The ears are honestly the star of the show, so they deserve a little extra attention. You can either cut them from pink candy melts that you've melted and spread thin on parchment paper, or pipe them using a piping bag fitted with a small round tip. If you're piping, let them set completely on the parchment before you peel them off and attach them with a tiny dab of fresh chocolate.
Storage and Make-Ahead Magic
These keep beautifully in an airtight container in the refrigerator for up to four days, which means you can make them two or three days before your event and not worry about them falling apart. You can actually bake the cake and make the frosting even earlier—just keep everything covered and let the assembled cake pops live in the freezer until you're ready to dip them.
- Don't let them sit at room temperature for more than an hour or the white chocolate coating will start to sweat and look streaky.
- If you're transporting them, keep them in a sturdy container and stack them gently so the stick doesn't puncture anything fragile.
- For a gluten-free version, swap in a gluten-free cake mix and double-check that your candy melts and food markers are certified gluten-free.
 Save
Save These little bunnies have a way of turning an ordinary afternoon into something festive and memorable. Every time you make them, you'll discover a small shortcut or trick that makes them easier, and that's the real magic of cooking—watching something become more natural each time you do it.
Recipe FAQs
- → How do I shape the bunny ears for the cake pops?
Cut pink candy melts into small ear shapes or pipe colored chocolate onto wax paper and let harden before attaching to the cake pops while the coating is still wet.
- → What is the best way to secure the stick in the cake pop?
Dip the tip of each lollipop stick into melted white chocolate before inserting halfway into each cake ball; this helps the stick stay firmly in place.
- → How should I store the finished cake pops?
Store them in an airtight container in the refrigerator for up to 4 days to keep them fresh and maintain their shape.
- → Can I make these cake pops gluten-free?
Yes, by using a gluten-free cake mix and ensuring all decorations are gluten-free, these treats can be adapted for gluten-free diets.
- → What can I use to decorate the eyes and whiskers?
Use an edible black food marker or melted dark chocolate to carefully draw eyes and whiskers once the coating has set.