 Save
Save My daughter came home from school with a hand-drawn invitation to her classmate's Easter party, and naturally she asked if we could make something special to bring. I found myself standing in the kitchen on a random Tuesday afternoon, suddenly inspired to create little bunny cakes—something whimsical that would make the kids actually excited about dessert instead of just grabbing it off a table. The funny thing is, I'd never decorated a cake to look like anything before, but something about baking small, manageable portions made the whole project feel less intimidating and way more fun.
The moment we set those little bunny cakes on the dessert table, I watched a shy kid who usually hangs back gravitate straight toward them, pick one up, and just smile at it before eating it. That's when I realized these weren't just cakes—they were tiny edible characters that somehow made a room feel lighter and more playful. My daughter still talks about how her friends fought over which bunny to take home, and honestly, that made every minute of piping and decorating worth it.
Ingredients
- All-purpose flour (1 1/2 cups): This is your structural foundation, and sifting it with the baking powder and salt really does matter for a tender crumb—I learned that the hard way with my first batch of dense, sad cakes.
- Granulated sugar (1 cup): Creaming this with softened butter is your secret to light, fluffy cakes that actually stay moist instead of turning into hockey pucks by day two.
- Unsalted butter, softened (1/2 cup for cakes, 1/2 cup for frosting): Softened means it yields easily to pressure from your finger—cold butter will fight you and won't incorporate properly, making your batter grainy and your frosting lumpy.
- Whole milk (1/2 cup for cakes, 2 tbsp for frosting): The milk tenderizes the crumb and keeps things from getting dry; it's the ingredient that separates these from store-bought dry little cakes.
- Large eggs (2): Room temperature eggs blend in smoothly and trap air, which gives you that cloud-like texture everyone loves.
- Baking powder (1 1/2 tsp): This is what makes these rise into actual cakes instead of dense, sunken pucks, so don't skip it or replace it with baking soda unless you know exactly what you're doing.
- Powdered sugar, sifted (2 cups): Sifting removes the lumps so your buttercream stays smooth and silky instead of grainy and annoying to pipe.
- Vanilla extract (1 tsp for cakes, 1 tsp for frosting): Use pure vanilla, not the imitation stuff—the flavor difference is subtle but real, especially when vanilla is the star.
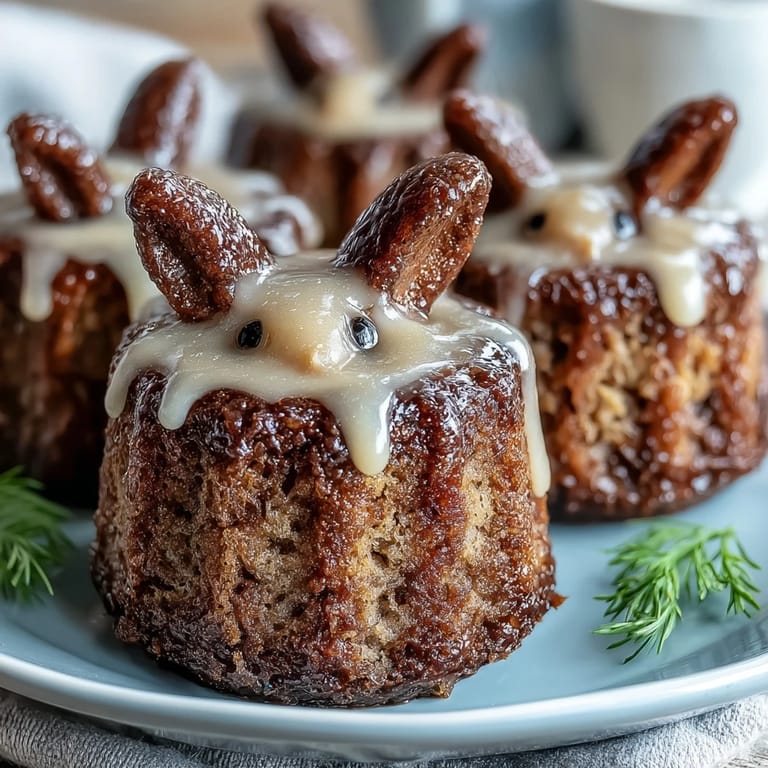
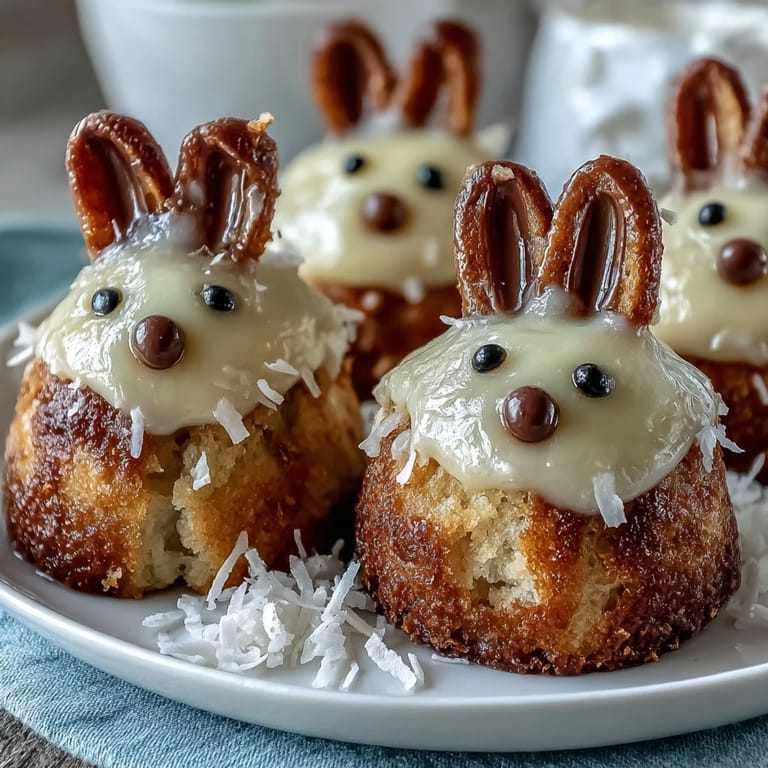
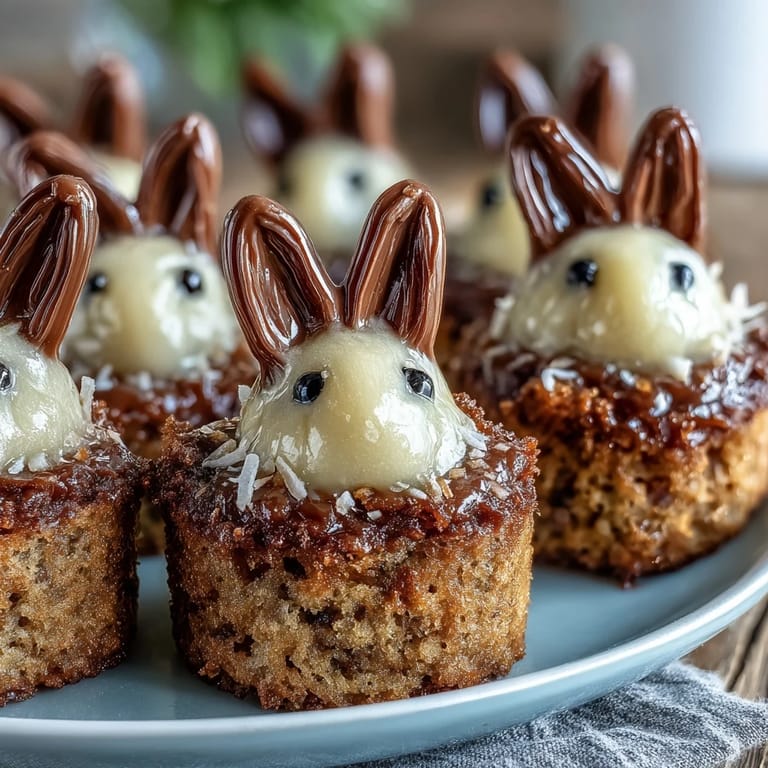
- Mini marshmallows: These become adorable bunny ears when you slice them in half lengthwise, and they stay soft enough to eat without turning into rubber.
- Pink candy-coated chocolates (for noses): Any small candy works here, but something with a little shine looks more intentional and less accidental on the finished cake.
- Mini chocolate chips (for eyes): Two chips per bunny face, positioned slightly off-center, somehow make them look personality-filled instead of blank.
- Shredded coconut or green sprinkles: This grounds each cake on a little bed of grass or garden, which transforms them from plain frosted cakes into a complete tiny scene.
Tired of Takeout? 🥡
Get 10 meals you can make faster than delivery arrives. Seriously.
One email. No spam. Unsubscribe anytime.
Instructions
- Get your oven ready and prep your pan:
- Preheat to 350°F and either grease your muffin tin or slip paper liners in—I prefer liners because they peel away so cleanly and keep the bottoms from browning too much. Line all twelve cups even if you're only making a few cakes, because it only takes an extra thirty seconds and it's one less thing to think about once you start mixing.
- Cream the butter and sugar until fluffy:
- Beat them together for a solid two to three minutes until the mixture looks pale and clouds form when you scrape the sides—this is where all your lift comes from, so don't rush it. You're basically trapping tiny air bubbles in the butter, which will expand in the oven and give you that tender, pillowy crumb.
- Add eggs one at a time with intention:
- Drop in the first egg, beat for about thirty seconds until it vanishes into the mixture, then repeat with the second one—rushing this step or throwing both eggs in at once can cause the batter to break and separate. It looks scary when it happens, but keep mixing and it usually comes back together.
- Fold in the dry and wet ingredients alternately:
- Start with half the flour mixture, then half the milk, then the remaining flour, then the remaining milk, mixing just until each addition disappears—overmixing develops gluten and makes tough cakes. The batter should look smooth and thick enough that a spoon dragged through it leaves a trail for a moment before settling back.
- Distribute batter evenly and bake with confidence:
- Fill each muffin cup about two-thirds full—this leaves room for them to rise without spilling over—then slide into the oven for eighteen to twenty minutes. The moment you smell something sweet and slightly caramelized, start checking with a toothpick; when it comes out clean or with just a few moist crumbs, you're done.
- Let them cool completely before frosting:
- This usually takes about an hour at room temperature, or you can pop them in the fridge for fifteen minutes if you're impatient like I am. Frosting warm cakes turns into a sliding, melting mess that pools on your plate instead of piping beautifully.
- Beat the buttercream until it's cloud-like:
- Creamed softened butter becomes smooth and pale after about two minutes, then you gradually sprinkle in the powdered sugar a handful at a time while beating—going too fast creates clouds of powdered sugar that coat your entire kitchen. Once it looks fluffy and light, add the milk and vanilla and beat for another minute until it reaches that glossy, spreadable texture.
- Tint the buttercream if you want a variety:
- Divide the frosting into bowls and add food coloring drop by drop until you reach the shade you want—remember that colors deepen slightly as they sit. Pastel tones look more elegant and less artificial than neon brights, but this is a kids' party so anything goes.
- Frost each cake with a small offset spatula or butter knife:
- Apply a generous dollop to the top of each cooled cake and smooth it out in a dome shape or flat top—this gives you a good surface for decorating. Don't worry about perfection; imperfect frosting actually looks more charming on tiny cakes.
- Assemble your bunnies with joy and intention:
- Slice mini marshmallows lengthwise to create two long ears, press them gently into the frosting at the top of each cake, then add a pink candy nose in the center of the face. Two mini chocolate chips become expressive eyes positioned slightly off-center, and suddenly you have a character instead of a dessert.
- Ground each bunny in a little garden:
- Sprinkle shredded coconut or green sprinkles around the base of each frosted cake to create grass or a garden bed—this detail transforms them from plain cakes into a little scene. Press the coconut gently so it adheres to the frosting instead of sliding around.
 Save
Save Watching a five-year-old at that party bite into a bunny cake with both hands and chocolate ending up everywhere except where it should be felt like an actual success—not because the cake was perfect, but because it brought exactly the kind of chaos and joy that Easter is supposed to have. These little cakes became the thing people remembered about the party, not the store-bought cookies or the fruit platter, and that's the real magic right there.
Scaling This Recipe for Different Occasions
I've made these cakes for birthday parties, Easter brunches, and even just as a Tuesday afternoon surprise for my daughter, and the beautiful thing is they scale up or down without complaint. The recipe makes twelve, which is perfect for a small gathering, but if you need more, it's easy to double everything and just use two muffin tins—the baking time stays exactly the same since you're still making the same size individual cakes.
Decorating Without Stress
The decorating part is genuinely where the magic happens, but it's also where people freeze up because they think it needs to look professionally done—it really doesn't. Half the charm comes from the slightly lopsided ears or the nose that's positioned just a little off-center, which gives each bunny personality instead of making them look like they came out of a factory.
Keeping Them Fresh and Ready
These cakes stay soft and moist for a solid two days in an airtight container at room temperature, or you can refrigerate them if you're making them ahead of time—just pull them out about thirty minutes before serving so the frosting softens back up and the cake returns to its proper tender texture.
- Store unfrosted cakes in an airtight container and frost them within a few hours of serving for the most vibrant appearance and cleanest presentation.
- If you're decorating ahead, refrigerate the finished cakes for up to four hours, which actually helps the frosting set and makes everything more stable for transport to parties.
- Keep a few extra candies and marshmallows on hand in case a decoration falls off or a bunny loses an ear, because you want to be able to do quick touch-ups right before the reveal.
 Save
Save These bunny cakes remind me that the best recipes aren't always complicated or labor-intensive—sometimes they're just the ones that make people smile when they see them. There's something deeply satisfying about taking simple ingredients and turning them into little edible characters that become the highlight of a gathering.
Recipe FAQs
- → How do I achieve a moist vanilla sponge?
Use softened butter and mix thoroughly with sugar until light and fluffy. Incorporate eggs one at a time and add milk gradually for moisture balance.
- → What is the best way to decorate the mini cakes as bunnies?
Use marshmallows cut in half for ears, pink candy-coated chocolates for noses, mini chocolate chips for eyes, and coconut or green sprinkles to mimic grass.
- → Can I make dairy-free versions of these cakes?
Yes, substitute unsalted butter with dairy-free alternatives and use plant-based milk such as almond or oat milk to keep the texture moist.
- → What tools are recommended for decorating?
Small scissors for cutting marshmallows, piping bags or spatulas for applying buttercream, and edible markers if you want to add fine details.
- → How long should I bake the mini cakes?
Bake for 18–20 minutes at 350°F (175°C), or until a toothpick inserted comes out clean to ensure they are fully cooked but moist.