 Save
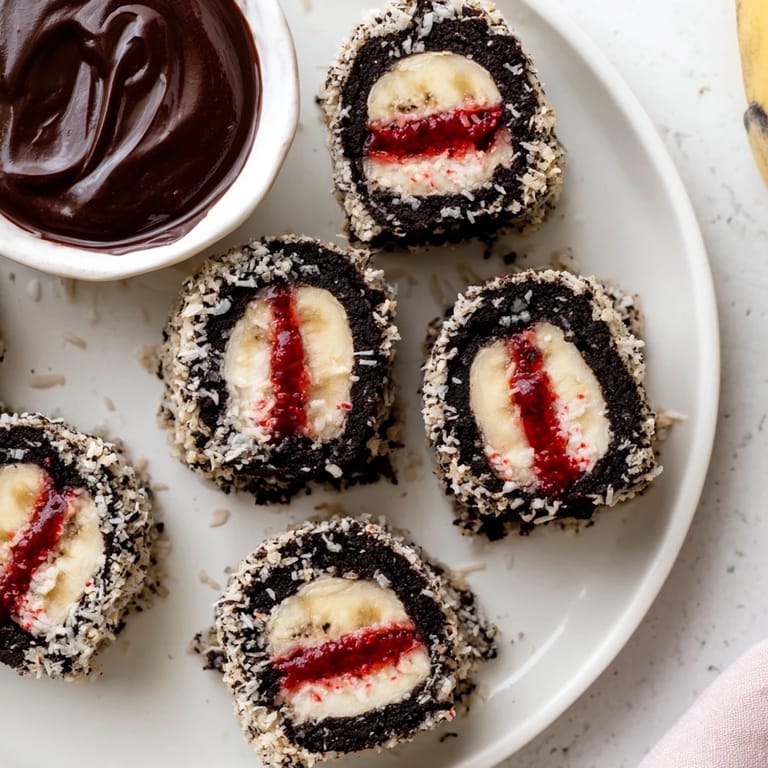
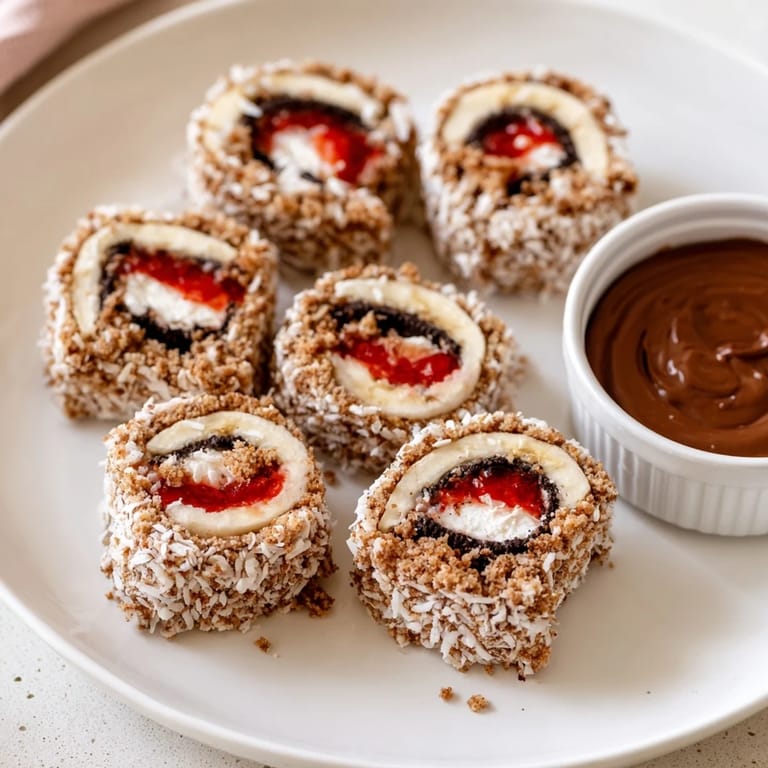
Save I discovered these at a friend's dinner party where someone had arranged them on a platter like actual sushi, and I genuinely did a double-take. The joke was funny enough, but one bite converted me completely—that crack of the Oreo cookie mixed with creamy filling and the playful chocolate dip made me want to recreate them immediately. What started as a novelty became my go-to when I needed something that would make people smile and actually taste incredible.
I made these for my niece's eighth birthday party, and watching her friends study them with confusion before biting in was worth every minute. One kid actually asked if they were real sushi, and the laughter when they realized what they were eating filled the whole kitchen. I've made them three times since because they became the dessert everyone actually remembers.
Ingredients
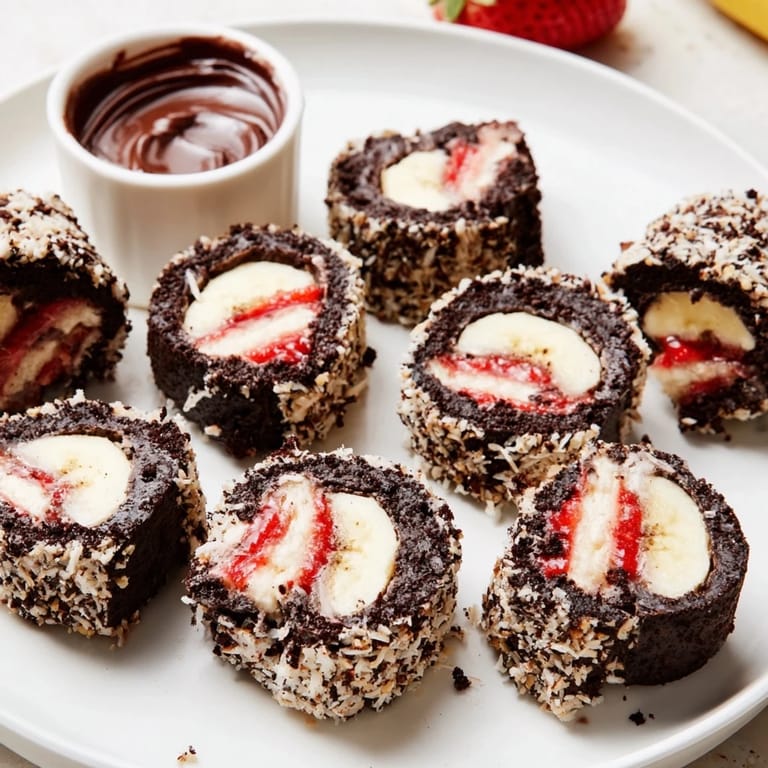
- Oreo cookies: These become your base and structural foundation—the food processor crushes them into the perfect crumb consistency that holds everything together when mixed with cream cheese.
- Cream cheese, softened: The binding agent that makes the Oreo crumbs sticky and moldable; take it out 15 minutes before you start so it blends smoothly.
- Banana: Provides the center core that gives you something to roll around; peel it right before assembling so it doesn't brown.
- Strawberry jam or fruit preserves: A thin spread adds moisture and flavor contrast without making the rolls soggy.
- Sweetened shredded coconut: Creates texture and visual appeal when layered in; it tastes like a treat but also helps hold everything together.
- Semisweet chocolate chips: The foundation of your dipping sauce; use good quality so it's smooth and glossy.
- Heavy cream: Keeps the chocolate silky and prevents it from being too thick or grainy.
- Soy sauce (optional): A tiny amount gives the chocolate an unusual depth and darkens it to look more like actual soy sauce—a fun detail that makes people pause.
Tired of Takeout? 🥡
Get 10 meals you can make faster than delivery arrives. Seriously.
One email. No spam. Unsubscribe anytime.
Instructions
- Pulverize the Oreos into magic dust:
- Separate the cookies and scoop out the filling first—this sounds tedious but it only takes two minutes. Put the cookie wafers in your food processor and pulse until they're fine crumbs with no large pieces; you want texture like wet sand.
- Create your moldable base:
- Add softened cream cheese to the crumbs and pulse again until everything sticks together like wet play dough. The mixture should hold together when you squeeze it but still be spreadable.
- Lay down your foundation layer:
- Spread plastic wrap on your work surface and press the Oreo mixture onto it in a rough rectangle about 8 by 6 inches and a quarter-inch thick. Use an offset spatula or the back of a spoon to even it out; it doesn't need to be perfect.
- Add the flavor layers:
- Spread a thin layer of strawberry jam across the surface—just enough to coat, not so much that it's sticky. Sprinkle the shredded coconut over the jam and press it gently so it adheres.
- Position your banana core:
- Lay the peeled banana lengthwise along one edge of the rectangle. This is what you'll roll around, so make sure it's positioned at one of the short ends.
- Roll with confidence:
- Use the plastic wrap to help you lift and roll the Oreo mixture around the banana, keeping it tight as you go. The wrap keeps everything from sticking to your hands and makes the whole process much cleaner; roll until you've wrapped everything around the banana and you have a log shape.
- Firm it up in the fridge:
- Wrap the whole thing in the plastic and refrigerate for exactly 10 minutes. This firms up the mixture enough that when you slice it, the pieces hold their shape without falling apart.
- Make the chocolate dip:
- While the roll chills, combine chocolate chips and heavy cream in a microwave-safe bowl. Microwave in 20-second bursts, stirring between each one, until everything is melted and smooth—usually three to four bursts total.
- Stir in the secret ingredient:
- Add a teaspoon of soy sauce if you're using it and stir until combined. It darkens the chocolate slightly and adds a weird complexity that makes people ask what's in it.
- Slice into sushi pieces:
- Remove the roll from the plastic wrap and use a sharp knife to cut it into one-inch thick pieces. Wipe the knife between cuts if it gets sticky; this creates cleaner edges.
- Plate and serve:
- Arrange the rolls on a platter with the chocolate dip in a small bowl alongside. Garnish with sprinkles or extra coconut if you want to go full festive.
 Save
Save The moment that changed everything for me was serving these at a potluck where someone's grandmother took one, studied it, bit into it, and then laughed and said, "Now that's the kind of sushi I understand." It became this beautiful bridge between playfulness and genuine deliciousness.
Playing with Flavors
These rolls are a canvas for whatever you're craving, and I've learned that small swaps create totally different vibes. I've made them with a layer of peanut butter underneath the jam for a more indulgent version, and once I skipped the banana entirely and added a handful of mini chocolate chips to the Oreo mixture instead. Each version tastes completely different even though you're working with almost the same technique.
Why the Chocolate Dip Works
The dip isn't just decorative—it changes everything about how these taste. That glossy chocolate coating makes each piece feel more intentional and luxurious, and honestly, the optional soy sauce is a game-changer if you're trying to impress someone with your attention to detail. It's subtle enough that people won't taste it directly, but it makes the chocolate feel less one-note and more mysterious.
Making This Your Own
What I love most about this recipe is how forgiving it is, and how much personality you can pour into it without breaking anything. Once you understand the basic technique, you're free to experiment with different preserves, swap the banana for fresh strawberries, or even try different cookie bases if you're feeling adventurous. The real magic is in the assembly and the presentation—that moment when someone realizes what they're holding.
- Fresh raspberries or sliced strawberries work beautifully if you want to skip the banana completely.
- For a nuttier flavor profile, layer in some almond butter or tahini instead of just jam.
- Make the chocolate dip thicker by using less cream, or thinner by adding more if you prefer dunking to drizzling.
 Save
Save These rolls have become my secret weapon for making people unexpectedly happy with dessert. Serve them with tea or milk and watch everyone's face light up.
Recipe FAQs
- → Can I substitute the banana in the rolls?
Yes, strawberries or other soft fruits work well for a different flavor and texture profile.
- → Is the chocolate soy dip necessary?
The dip adds a rich, smooth contrast that complements the sweet rolls, but it can be omitted or served with alternative sauces.
- → How should I store these rolls?
Keep refrigerated in an airtight container to maintain freshness and firmness for up to 2 days.
- → Can I add nuts to the filling?
Absolutely. A layer of peanut butter or chopped nuts can add texture and a nutty flavor twist.
- → What tools are needed for preparation?
A food processor for crushing cookies, plastic wrap for rolling, a microwave-safe bowl for melting chocolate, and a sharp knife for slicing.